We're getting there but this bathroom has not been without its problems!
At the end of my last post, the ceiling lights were dangling out of the ceiling. Since then we have put the coving up, painted the ceiling/coving and fitted the bezels on the lights. The walls won't be painted white, that was just the watered down paint on the new plaster.
 We positioned the bath and base units to see how much of the floor needed boarding before the floor was tiled, and then I spent an hour or so marking the floor at intervals of 150mm whilst my husband screwed it to the floor - tedious!
Because the units sit on very low feet (they don't have legs which can sit behind the floor tiles with a plinth which clips to the legs) we had to get the floor tiled before we did anything else as we wouldn't be able to tile under them - or the tiler wouldn't!
Having done that we were ready for the floor to be tiled and we're really pleased with the result.
The next thing we did was to level and fix the bath. The bath panel is a fixed height and so we couldn't fix the bath to the wall or floor until we knew the finished height of the floor. Fitting the bath was more time consuming than we thought it was going to be - each time we got it level, then made attempts to fix it to the floor and wall it moved and then wasn't level and it has to be level front to back as well as along the length - you get one bit level and then the rest isn't! We got there in the end but it took all day!
Ideally you would fit the tap and pop up waste before fixing the bath as it's just easier to get to all the fixings without the restrictions of working in a limited space. We didn't do that, and it was a conscious decision but I can't remember why! We did, however, decide where the tap would go and cut the hole for it in the bath.
 The next thing to do was build the boxing at the end of the bath which will later be tiled. It snowed that day but that wasn't going to stop our progress!
 |
| Boxing in place at the end of the bath |
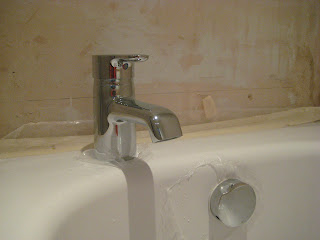
Because of the workings of the pop-up waste, and because of the style of the tap (the lever goes back), there wouldn't have been enough room to operate the tap if we had put it centrally at the end of the bath - the thickness of the tiles and adhesive on the wall would have prevented the tap opening fully. We therefore had to position the tap slightly off centre - it's a design feature of course!
 After fitting the pop up waste and tap, we had to get water to the taps which meant running pipes from the other end of the bath as we've turned the bath around to allow the shower screen to fit against the wall - the window slightly overhangs the width of the bath and so we had nothing to fix it to. To give extra strength to the bath we fitted 'legs' to the wall underneath the bath frame at both ends.
Next on the list was to fit the wall units and get them level before bolting them together - something else which took longer than we hoped. And (like the bath) not helped by the fact that the walls are not square! We also had to decide where on the wall to place them - if we had fitted them tight up against the right hand wall, the tiles would have prevented us getting access to the cistern panel. We've left a gap so that the tiles can go just behind the unit and I'll fill any gap which is left after it's been tiled with silicone.

 After fitting the units we fitted the concealed cistern and checked the length of the flush pipe (hence the loo).
At that point, we discovered that the panel which fits behind the loo was damaged. We'd already had to request a replacement cupboard door from Bathstore but we noticed the damage to the loo panel after the 14 day inspection period. Although Bathstore replaced it very quickly without question, the replacement is also damaged and so we are awaiting a replacement for the replacement!
We then had the scary part - cutting the worktop and fascia for the basin! Although they supply a template with the basin which has a fold line which you position on the edge of the worktop, it's really easy to make a mistake - we know, we've done it before when we did our ensuite bathroom! When you cut the fascia you have to allow for the thickness of the worktop and so you position the fascia section of the template higher up the fascia (by the thickness of the worktop).
 |
| SUCCESS!! |
The picture (below left) with the basin in situ does not convey the problems we had fitting it! We fitted the tap and pop up waste first which wasn't too difficult, apart from getting the tap straight and tight - each time you tighten it, it's not straight and when you straighten it, it's not tight! The basin fixing brackets are really difficult to fit inside the holes in the basin, bearing in mind the basin is 550mm wide and is fitted within a unit which is only 600mm wide - my husband spent the whole evening flat on his back with his arms up inside the cabinet whilst I was shining a torch up inside the cabinet - usually in the wrong place! We eventually finished at 11.15pm!
On Friday evening we plumbed in the basin and connected the waste pipe - I say 'we' but my involvement was really just passing the right spanner at the right time! This evening, my husband clipped the pipework to the wall whilst I fitted the hinges and push fittings to the cupboard doors - I obviously don't know my own strength as I managed to ruin one of the doors when I fitted the push fitting to the door (which is why there is only one door on the cupboard at the moment whilst we think of a fix!). Anyway, we're now just about ready for the room to be tiled tomorrow!
And while the bathroom is being tiled, I will be writing my Christmas cards and putting up the tree and decorations which so far, I haven't had time to do - even the cats are thinking it's about time we started to get festive!


Floor waste has evolved beyond its basic function. Today, it comes in a variety of shapes, materials, and finishes to match different styles of bathrooms. From round and square grates to sleek linear trench drains, you can find designs that blend seamlessly with tile patterns or stand out as a stylish accent.
ReplyDeleteMaterials such as stainless steel, brass, or matte black finishes allow homeowners and designers to choose floor drains that complement the overall aesthetic of the space without compromising functionality.
https://avahome.pk/product-category/floor-waste/
Great read! I’ve been exploring ways to renovate my space, and your insights are really helpful—especially when choosing <a href="https://vcwoodworks.com/projects/vanity-cabinets/>modern bathroom cabinets</a> for a sleek, updated look.
ReplyDeleteGreat read! I’ve been exploring ways to renovate my space, and your insights are really helpful especially when choosing <a href="https://vcwoodworks.com/projects/vanity-cabinets/>modern bathroom cabinets</a> for a sleek, updated look.
ReplyDelete<a href="https://vcwoodworks.com/projects/vanity-cabinets/>modern bathroom cabinets</a>
ReplyDeleteLuxury wash basins Sydney retailers offer bring a premium touch to any bathroom renovation. I enjoy the refined materials, sculpted shapes, and elegant finishes. These basins pair beautifully with modern vanities, enhancing both practicality and style in sophisticated bathroom spaces.
ReplyDelete