I love to look around other people's houses and thought that you might like a little look around mine! Whilst waiting for the plaster to dry in our family bathroom (more on that in a future post), I've had a look back through the photo albums and found photos of the house as it was when we first moved in - in all its wallpapered glory!
We moved into our house in November 1999 (11 years ago yesterday as I write this!) and if anyone had said to me that 11 years on, we would still have deep rose pink fleur de lys carpet anywhere in the house I would have vehemently denied it! However, the sad fact is that we still do - albeit it only on the stairs and landing. We still have lots to do (including the stairs and landing - that carpet's not staying!) and now that I have a bit of spare time again, my plan is to complete what we set out to achieve 11 years ago!
First of all, some 'before' photos, which will bring back memories for friends and family reading this post. These were taken in a pre-digital age and have been scanned so the quality is not great, which is probably no bad thing!
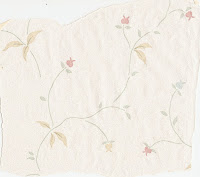
The previous owners were elderly and must have had some prior connection to the hotel / pub industry if the carpet is anything to go by! We often see 'our' carpet on TV programmes and normally in a pub or B&B! You needed vision to buy our house, to see beyond the wallpaper, which was different in every room - and was so awful I had to keep bits of it to remind myself of the progress we've made!
The hall with the living room off to the right and the kitchen at the end of the hall.
The wallpaper from the hall stairs and landing
Living room, complete with child, now a grown up 21 year old!
This is the wallpaper in close up from the living room - thankfully only on one wall but it was enough!
How about this for busy artex?!
We had 3 different styles of artex in our house - this was in the living room & dining room
The dining room, with the wallpaper below, right.

 No wallpaper in here but those patterned carpet tiles more than compensated!
Downstairs cloakroom with a very 80's green suite! This room also had the fleur de lys carpet, although at this stage I'd had a go with the stencil by the looks of things!
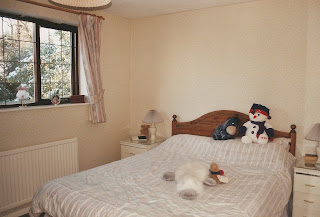 The master bedroom (actually in here I'm not sure what's worse, the wallpaper or all the cuddly toys on the bed!)
 Wallpaper from the master bedroom - more flowers!
 En suite bathroom (this picture was taken when we were planning the new bathroom, hence the panel which we'd cut out to see if it would be feasible to conceal the cistern in a base unit)
 The second bedroom, and a priority as that wallpaper (on all 4 walls) was not good for a 10 year old boy!
Strangely no picture of the third bedroom
but this is the fourth bedroom (box room really)
The wallpaper from the fourth bedroom
And finally, a couple of before pictures of the family bathroom - I say 'before' but until a week ago, it was current - I will be posting the progress of the bathroom shortly!
We did have the fleur de lys carpet in here too, but carpet in bathrooms being one of my pet hates, that was soon replaced with vinyl tiles!
. . . . . . . . . . . . . . . . . . .
So, what have we done so far? Well, we've made some progress but everything we've done was before I'd completed my course (no time to even breathe while I was studying!) and now that I've finished my course I realise there is still so much more we could do and need to do!
I'm therefore thinking of these pics as 'interim' rather than finished, but still an improvement on the original which is not difficult!

So far in the hall we've put laminate flooring down to replace the carpet and added a dado rail, which I would now like to remove but I'm not sure that it will come off without bringing the wall down! When we re-do the hall we'll also change the banisters to spindles and may replace the laminate with real wood - but by the time we get to it I expect I will have changed my mind again!
In the living room we've replaced with gas fire with an open fire (prompted by the loss of an oak tree from the back garden and the resulting mountain of wood to burn - I had wanted one for ages and this provided the perfect opportunity!)
I love accessories (cushions in particular!) and am frequently buying new additions and swapping cushions between the sofas. I think as a reaction against so much pattern in the living room, this room seems very plain, but it's also very easy to live with! Not planning to change this in the near future, although the cream carpet wasn't a practical choice! Although not visible on the photos we re-hung the door from the hall so that it opened to the right instead of the left and is much better as it doesn't appear to cut the room in half when it's open. In both rooms we had the ceilings plastered flat to get rid of the busy artex!

We also re-hung the door in here and the room feels bigger as a result. Throughout the ground floor we replaced all the Flemish glazed doors with plain bevelled glass doors and it's made it feel much bigger. I'm now thinking this room could do with a bit of colour and pattern and may replace the curtains at some point.
We didn't have the budget to replace the kitchen (and still don't!) but it definitely needed something! We replaced the worktops, sink, tap and tiles - and the floor! The two glazed cupboards were originally next to each other on the wall opposite the windows. The original cupboards above the kettle were too short and I thought it would be better to move one of them over the other side of the kitchen and split the glazed cupboards and position them either side of the remaining shorter cupboard. It took a bit of time but, after a coat of paint and with the installation of lights in the glazed cupboards and underneath all the wall cupboards, it's much improved!
In the downstairs cloakroom we replaced the green suite with a white one, replaced the fleur de lys carpet with ceramic tiles - and I painted over my stencilling!
This room is next on my list - after the family bathroom! What you can't see are the horrible Formica wardrobe doors with plastic beading - nice! We have had all the windows replaced and consequently the window frame is now white inside which is much better (makes all the rooms feel much lighter) but this room definitely needs bringing up to date a bit!

 We started our en suite bathroom nearly 4 years ago and I'm ashamed to say it's still not finished! It has moved on a bit since these photos were taken, but one of them shows the problem we had trying to fit the concealed cistern into a unit with the soil stack in the corner.
 We now have a different mirror as the original has stopped working which shows how long it's been in situ (it's illuminated from behind and the pull cord broke). We have underfloor heating in here which apparently will be working when we do our bedroom (!) as it involves lifting floorboards to run the cables to a power supply so watch this space!
This room has changed again since this photo was taken (at 21 my son has outgrown the trucks and diggers floor cushion!), but it wasn't tidy enough to show on here! However, it's still an improvement on the flowery wallpaper and was fine for a 10 year old!
 Another room to be re-done (I'd been at it with the stencils again when I did this room - it was 10 years ago!) - but still better than the state it was in when we moved in!


